Common Issues

Here are some common problems encountered while running Cytoscape, and with instructions on how to solve them.

Inability to start Cytoscape - Invalid CEN header (Java 11.0.8 or Java 17.0.20)

Behavior

Cytoscape 3.9.x fails to start if Java 11.0.8 is used.
Cytoscape 3.10.0 fails to start if Java 17.0.20 is used.

Users may see the following error in output (for command line invocation):
Caused by: java.util.zip.ZipException: Invalid CEN header (invalid zip64 extra data field size)

The error is due to changes in validation of zip files. See here

Work around

On Linux/Mac OS the work around is to run the following export command in the terminal before invoking cytoscape.sh

export EXTRA_JAVA_OPTS="-Djdk.util.zip.disableZip64ExtraFieldValidation=true"

Log4j Vulnerability

We have screened all log4j dependencies in the core Cytoscape application, including core apps, as well as the hundreds of apps in the Cytoscape App Store. This is our current assessment and plan of action:

The typical pattern from this exploit is through HTTP requests to a web server. The CyREST component of Cytoscape does not use a vunlerable version of log4j. That's good news! As a standalone, desktop application the only other exposure is through user-directed actions, e.g., importing a file from online. Please use caution with importing any type of network or data files into Cytoscape.

We have released a new 3.9.1 version of Cytoscape which addresses all known log4j issues. In more detail, we updated log4j dependencies in Cytoscape to 2.17.1 via pax-logging (1.11.13). This update fixes the following vulnerabilities: CVE-2021-4104, CVE-2021-45046, CVE-2021-44228, and CVE-2021-44832.

We have also worked with app authors to produce updated references in their project packages. Conveniently, the apps using log4j via the ops4j pax package will automatically adopt the latest version provided by the 3.9.1 release. Nevertheless, we are working with app authors to update all log4j dependency references in their projects to avoid even the appearance of vulnerability.

After the release of Cytoscape 3.9.1, we identified another log4j component that uses an old version of Log4J 1. To our knowledge, this component is *not* vulnerable to any of the known log4j 1.x attacks since it includes it's own log4.properties file that does not use any of the vulnerable logging mechanisms. Nevertheless, in an abundance of caution, we have created a version of this component that specifically strips out all of the vulnerable classes, including JMSSink.class (fixes CVE-2022-23302), JMSAppender.class (fixes CVE-2019-17571), SocketServer.class (fixes CVE-2019-17571), JDBCAppender.class (fixes CVE-2022-23305), SMTPAppender.class (for completeness), and all of the embedded Chainsaw classes (fixes CVE-2020-9493). None of these classes were used for the indicated component, and based on our reading of the CVE's referenced above, the included log4j.properties file rendered these vulnerabilities moot. However, the replacement component, with the noted classes removed is available for download at: uk.ac.ebi.enfin.mi.cluster.micluster-1.6.jar. Put this jar file in the directory /Applications/Cytoscape_v3.9.1/framework/system/cytoscape-temp/uk.ac.ebi.enfin.mi.cluster.micluster/1.6 on a Mac, \Program Files\Cytoscape_v3.9.1\framework\system\cytoscape-temp\uk.ac.ebi.enfin.mi.cluster.micluster\1.6 on a Windows machine, or /opt/Cytoscape_v3.9.1/framework/system/cytoscape-temp/uk.ac.ebi.enfin.mi.cluster.micluster/1.6/ on Linux. Note that these are the default locations, and if you installed Cytoscape 3.9.1 in an alternative location, then you should substitute the appropriate path.

Inability to start on Mac OS

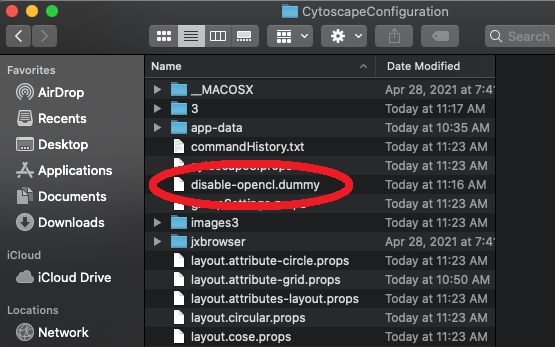
Recent updates of Mac OS have caused the OpenCL based Cytoscape Apps to fail on some machines. If this is the case, you can disable OpenCL with the following method:

Download the disable-opencl.dummy file to your CytoscapeConfiguration directory. You can browse to this directory from the Home location on your Mac. After you have downloaded it, your folder should look similar to the screenshot below.


Alternatively, if you are comfortable using terminals, you can create this file using the following command:touch ~/CytoscapeConfiguration/disable-opencl.dummy


Basic Troubleshooting

First, follow the steps outlined in our Troubleshooting page

If you’ve run the System Checker script on that page, please include the output from it in any bug reports or help requests. It will contain important information about your configuration that can help diagnose the problem.

Finding Additional Log Info

Sometimes, additional log info can be needed to diagnose Cytoscape problems. There are two sources of log information that can be further analyzed.

Console Output

This is console output from running Cytoscape. You will need to open a terminal in your operating system and copy any output you see produced.

Framework Log

This is a log file generated automatically by running Cytoscape. It is normally located in the following places.

Setting JAVA_HOME

Windows

Using Windows Settings
  1. Locate your Java installation directory

    If you didn't change the path during installation, it'll be something like C:\Program Files\Java\jdk1.8.0_65

    You can also type where java at the command prompt.

  2. Do one of the following:

    • Windows 7 Right click My Computer and select Properties > Advanced
    • Windows 8 Go to Control Panel > System > Advanced System Settings
    • Windows 10 Search for Environment Variables then select Edit the system environment variables
  3. Click the Environment Variables button.
  4. Under System Variables, click New.
  5. In the Variable Name field, enter JAVA_HOME
  6. In the Variable Value field, enter your JDK or JRE installation path.

    Example: C:\Progra~1\Java\adoptopenjdk-11-hotspot-amd64*

    *Note for Windows users on 64-bit systems:

    • Progra~1 = 'Program Files'
    • Progra~2 = 'Program Files(x86)'

  7. Click OK and Apply Changes as prompted

You'll need to close and re-open any command windows that were open before you made these changes, as there's no way to reload environment variables from an active command prompt. If the changes don't take effect after reopening the command window, restart Windows.

Using Windows Command Line

If you would prefer to set the JAVA_HOME (or JRE_HOME) variable via the command line:

  1. Open Command Prompt (make sure you Run as administrator so you're able to add a system environment variable).
  2. Set the value of the environment variable to your JDK (or JRE) installation path as follows:

    setx -m JAVA_HOME "C:\Progra~1\Java\jdk1.8.0_XX"

    If the path contains spaces, use the shortened path name.

  3. Restart Command Prompt to reload the environment variables then use the following command to check the it's been added correctly.

    echo %JAVA_HOME%

    You should see the path to your JDK (or JRE) installation.

Mac or Linux

  1. Open Terminal
  2. Confirm you have JDK by typing which java. It should show something like /usr/bin/java.
  3. Check you have the needed version of Java, by typing java -version.
  4. JAVA_HOME is essentially the full path of the directory that contains a sub-directory bin, which contains the JVM. It generally looks like this: /Library/Java/Home

    Set JAVA_HOME to this path using this command: export JAVA_HOME=/Library/Java/Home

  5. Use echo $JAVA_HOME to confirm the path
  6. You should now be able to run your application

This only sets JAVA_HOME for the current session. To persistently set it, follow these steps:

  1. Open Terminal
  2. Type emacs .profile to edit your profile.
  3. Add this to the end of the .profile file:

    JAVA_HOME=/Library/Java/Home
    export JAVA_HOME;

  4. Save and exit emacs; use the following key combinations and follow any prompts: ctrl-x, ctrl-s; ctrl-x, ctrl-c
  5. Open a new Terminal window and type: $JAVA_HOME/bin/java -version

    You should see something like the following:

    openjdk version "11.0.9" 2020-10-20
    OpenJDK Runtime Environment AdoptOpenJDK (build 11.0.9+11)
    OpenJDK 64-Bit Server VM AdoptOpenJDK (build 11.0.9+11, mixed mode)

Scaling Cytoscape on a High DPI Monitor

Cytoscape may not scale well on High DPI monitors. If this is the case and you are running on a Linux machine, you can add the following line to the cytoscape.sh file:

export GDK_SCALE=2

This works on Ubuntu 18.04 with GNOME/Cinnamon. However, scaling is not respected if one starts the application via the Cytoscape.desktop application shortcut, only if launched from the terminal.